

Despite the stereotypical associations of the Ivory Tower replete with cardigans and leatherbound books, the life of a modern, early-career academic is not really the most civilized. I've eaten my share of questionable, unidentified leftovers from communal department refrigerators. As the school year progresses, the definition of "clean" laundry often degrades from "I wore this once already, it's dirty" to "I don't smell too bad, plus everyone has a stuffy nose and a cold, so no one will care." One professor I know refuses to wash her mug so that no one else will use it, and she'll always have something available to drink from (though even I question the health risk of drinking out of said mug). Another professor I know thanks her husband in her dissertation acknowledgements for making sure she showers from time to time. As for those cardigans, mine are often riddled with holes, but as long as the sleeves are still ~80% attached, I dare say they are still wearable. Plus, thumb holes (even if unintentional) are so hip, right?

Luckily, however, we do somehow manage to make up for day-to-day unrefinement every now and then. Like at Sunday tea. We academics know how to do tea.
My good friend and colleague, Andréa (who is also a recipe developer for sated), invited me over last weekend as part of a Lab Ladies' Sunday Tea. In a somewhat unusual circumstance, Andréa is part of a lab that is predominantly female, which is quite awesome given the usual gender imbalance (read: male dominance) in the more theoretical and STEM-oriented subfields of linguistics. It was so much fun to be a member-by-courtesy and to get together and talk about linguistics, debate how to properly drink tea (milk before tea or tea before milk), and vent about dissertating. We even had a bit of a more formal dress code for Sunday tea, to be proper--I think it's the first time I've worn actually girly amounts of make-up in ages (and brushed my hair). And, these girls are all talented bakers, as demonstrated by the impressive homemade spread they turned out:


[Top: Cinnamon challah; bottom-left to right: sweet potato-pecan cupcakes with cream cheese frosting, apple and cheddar salad]


[another lesson I learned: apparently, the tradition is to not cut challah, but break off chunks instead. We learned this after making the first cut. :)]
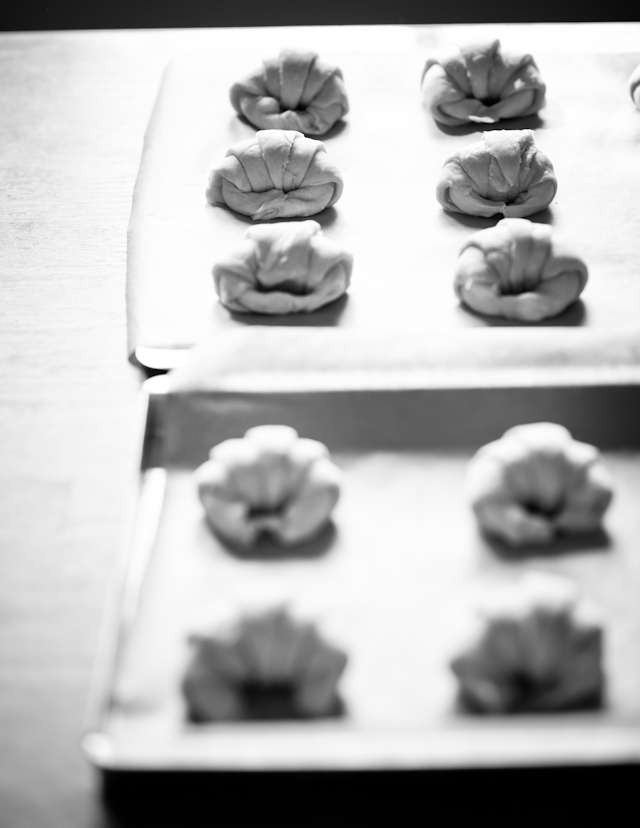
In perhaps the most impressive stroke, Andréa made her own croissants. They were so delicious and flakey fresh out of the oven--the entire kitchen smelled perfectly divine while they were baking. Having freshly made croissants is such a rare treat that moments like these (which are thankfully shared with awesome friends) definitely make up for the unglamour-ousness of daily academic life. I asked Andréa if she would share her croissant recipe here on the blog, and she agreed, so it is below!

Read on for recipe....
Croissants
by Andréa Davis
adapted from Fine Cooking and sated: issue 2
Plan:
Day 1: Mix dough (1 hour)
Day 2: Fold in butter (1.5 hours)
Day 3: Shape and bake croissants (4 hours)
In general, it is best not to make croissants on a hot day, or during the summer. The butter has to stay cold.
for dough:
5 oz cold water
5 oz cold whole milk
generous tablespoon yeast
2 oz granulated white sugar
18 ounces AP flour
3 tbsp unsalted butter, room temperature
2 1/4 tsp salt
for butter layer:
10 oz cold butter
Day 1:
Mix together water, milk, yeast, and sugar in a medium bowl. Let sit for 5 minutes. Add flour, and stir until dough comes together. Let sit (autolyse) in the refrigerator for 20 minutes.
Turn dough into a food processor with a dough blade. Run processor for about 45 seconds, then check dough's gluten development using the windowpane test. If the dough doesn't pass the windowpane test, run the food processor for another 15 seconds and try again. Make sure the dough doesn't get too warm, which could kill the yeast; also be careful of over-mixing the dough. When the gluten is developed, add the 3 tbsp butter and salt, mix briefly (about 5 seconds), then turn out onto the counter and knead by hand just enough to get the salt and butter fully incorporated. Put the dough into a sealed container and refrigerate overnight.
Alternatively, if you have a stand mixer with a dough hook, it can be used to knead, or you can knead by hand. In either of those cases, there's no need to keep the dough cold as with a food processor, but they take a bit longer and introduce more oxygen into the dough, which affects flavor. Whatever method you use, make sure the dough passes the windowpane test as above.
Day 2:
Prepare the butter block as follows. Take the butter out of the fridge, and cut into
1/2" thick pieces, and lay them out on a sheet of parchment or wax paper into a roughly square pattern, with edges of pieces touching. Take another sheet of parchment or wax paper and lay over the butter. With a rolling pin, gently smash and pound the butter, then start rolling, so that the pieces of butter meld into each other. Roll out into a 7.5" square, then refrigerate while you roll out the dough.
Take the dough out of the fridge. Lightly flour the counter, and lay the dough out. Roll out dough to a rectangle that is about 10" square. Take the butter out of the refrigerator. If it is cold but pliable, it is ready. If it is still warm and soft, let it sit in the refrigerator a little longer.
When the butter is cold enough, lay it on the dough so that the corners of the butter are centered on the sides of the square of dough. In other words, if the dough is laid out as a square in front of you, position the butter as a diamond on top of it. Fold the flaps of dough over the butter, and seal, so that no butter will escape, and it is entirely unexposed.
Lightly flour the rolling pin, and roll out the dough into a rectangle. Make a rectangle about 8" by 24". Fold the dough in thirds, as you would a letter. Put the dough back into the sealed container, or wrap in a damp towel, and place in the freezer for 20 minutes.
After 20 minutes, place the dough on the lightly floured work surface with the fold horizontal to you. Roll out the dough to 8" by 24", with the long side spreading out horizontally to you (ie, in the same direction as the fold line was). Place in the freezer for 20 minutes. Repeat the folding process one more time, then put the dough in the refrigerator overnight.
Day 3:
About 4 hours before you want to eat the croissants, take the dough out of the refrigerator. Roll it out to 8" by 44", then trim the edges so that the length is 40". Cut the dough into isosceles triangles that are 5" at the base. You can also make smaller croissants that are 4" at the base. Lay them on a baking sheet and refrigerate for an hour, covered with a damp towel.
Take the triangles out of the refrigerator. For each triangle, stretch it slightly by holding the base of the triangle with one hand and pulling up on the dough with the other. Then lay it out on the work surface, with the base of the triangle facing you. Roll up gently, without pressing too hard (you want to maintain the layers you're creating). Take the ends of the croissant and bring them together, so that it forms a crescent (un croissant!). Lay the croissant on a parchment-covered baking sheet. Form the remaining croissants in the same way. Make sure to leave space between the croissants, as they will expand quite a bit. You'll need at least two baking sheets.
Let the croissants proof for 2 hours. Choose a part of the house that is about 75 degrees, so that the butter doesn't melt. In the last half hour of proofing, preheat the oven to 400 degrees.
After 2 hours of proofing, if desired, brush with an egg wash. Bake the croissants for 8-10 minutes at the 400 degree temperature. Then turn down the temperature to 365 and bake for 7-10 more minutes. Take the croissants out of the oven and let cool for a couple minutes, then eat warm, or wait until they cool completely and eat cold.

Enjoy!


Amazing! I think if I made my own croissants I'd pass out in horror from all that butter...
ReplyDeleteI love nothing more than a good tea time! I totally got spoiled too while we were in London. I swear, that's where I'm destined to end up...
ReplyDeleteThat's why you invite people over to share all that butter with. ;)
ReplyDeleteMe. Too. I am such an anglophile.
ReplyDeleteThank you for the detailed and easy to understand instructions. I look forward to using this recipe.
ReplyDeleteCan you tell me where the elephant teapot is from?? My mother loves tea and elephants, and I'm thinking it would be the PERFECT Xmas gift for her, if I could find one!!
ReplyDeleteI still haven't made my own yet and NEED to. Yours are gorgeous!
ReplyDeleteBeautiful!
ReplyDeleteWhat type of yeast did you use?
The teapot is my friend's, but I think it's this one on amazon: http://www.amazon.com/gp/product/B000MFIRN0/ref=as_li_ss_tl?ie=UTF8&camp=1789&creative=390957&creativeASIN=B000MFIRN0&linkCode=as2&tag=dessertsfo-20
ReplyDeleteCroissants home made are the best. Love a tea time with friends.
ReplyDeleteThe tea pot,,,,too cute.
I checked with Andrea, and this is what she writes:
ReplyDelete"I'm guessing the reader means active yeast vs instant yeast. I'm actually 100% not sure, but I think it was active, which is what I normally have. Either should work, though instant can just be added straight with the flour, and you don't need quite as much. Here's a post on active vs instant yeast on the Fresh Loaf:
http://www.thefreshloaf.com/node/2815/active-yeast-vs-instant-yeast
I would say, though, rapid rise should not be used for this recipe. Fresh yeast is probably fine too, though I wouldn't know how much to add. I did not use osmotolerant yeast."
Hope that helps!
Wow I want to be invited this tea! Everything looks amazing, especially the croissants. They do seem very time consuming though or I would definitely make them!
ReplyDeletelooks like an incredible meal. I could basically eat croissants all day long - I need to move to Paris.
ReplyDelete-Alecia www.likesof.us